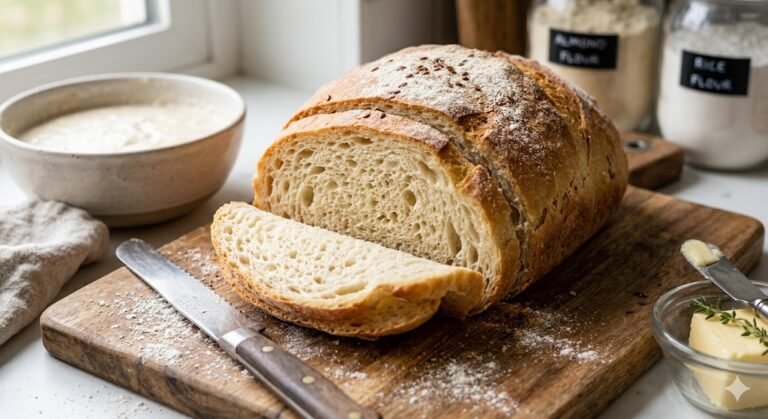

3 ingredient simple seeded bread
3 Ingredient Simple Seeded Bread: The Easiest Homemade Bread You’ll Ever Bake
There was a Tuesday evening last winter when you might have found yourself in the same spot I was—exhausted after a long day, stomach growling, and staring at a nearly empty pantry. Three things sat on the counter: a bag of flour, a measuring cup of water, and a handful of seeds from the back of a drawer. No yeast. No eggs. No butter. No hope, you might think.
But what came out of the oven forty-five minutes later changed everything.
This 3 ingredient simple seeded bread is not just another recipe to bookmark and forget. It is proof that you do not need a culinary degree, fancy equipment, or a full pantry to pull something extraordinary out of your own oven. It is the kind of bread that makes you stop mid-bite and wonder why you ever thought baking was complicated.
What Makes This Bread Different
You have probably seen “simple” bread recipes before. They usually hide a catch—special flour you cannot find, a technique that takes three days to master, or an ingredient list that quietly grows to twelve items once you read the fine print.
This is not one of those.
The 3 ingredient simple seeded bread works because it strips baking down to what actually matters. Self-rising flour brings the structure and the lift. Water brings everything together. Seeds bring the crunch, the nutrition, and that satisfying rustic look that makes people think you spent hours in the kitchen.
You do not knead. You do not proof. You do not wait.
Why You Will Fall Hard for This Recipe
Let us be honest about what you are really looking for when you search for bread recipes at ten o’clock at night. You want something that works without making you feel stupid when it does not. You want your kitchen to smell like a bakery. You want to slice into a warm loaf and feel like you actually accomplished something today.
Here is what this bread gives you:
-
Zero intimidation factor. If you can stir a bowl and turn on an oven, you can make this. No stand mixer. No dough hook. No thermometer.
-
Real money saved. A decent seeded loaf at the grocery store runs six to eight dollars. This costs you about two dollars and change. Multiply that by a year of sandwiches, and you are looking at serious savings.
-
Total control. You pick the seeds. You pick the shape. You make it yours.
-
Speed that actually fits your life. From the moment you reach for the flour to the moment you pull out a golden loaf, you are looking at under an hour. That includes baking time.
What You Actually Need
This is where most recipes try to impress you with obscure ingredients. Not here. You need three things. That is the whole point.
Table
| Ingredient | Amount | What It Does |
|---|---|---|
| Self-rising flour | 2 cups (250g) | This is your backbone. It already has baking powder and salt mixed in, so the bread rises without any help from you. |
| Lukewarm water | 1 cup (240ml) | Hydrates the flour and activates the leavening. Not hot. Not cold. Lukewarm. Think bathwater for a baby. |
| Mixed seeds | ½ cup (75g) | Sesame, sunflower, pumpkin, flax—whatever you have. This is where the flavor and the visual appeal live. |
That is it. If you want to get fancy, a pinch of salt or a drizzle of honey will not hurt. But they are not required. The beauty of this 3 ingredient simple seeded bread is that it refuses to demand more than you have.
How to Bake It Without Stress
You have stared at enough recipe instructions that read like engineering manuals. These steps are written for real humans with real kitchens and real impatience.
Step 1: Crank your oven to 400°F (200°C). Line a baking sheet with parchment paper. Do not skip the parchment unless you enjoy scraping bread off metal.
Step 2: Dump your self-rising flour and seeds into a bowl. Stir them together with a fork. This takes about fifteen seconds.
Step 3: Pour in the water. Stir until you have a shaggy, messy dough. It should look rough. It should not look smooth like cookie dough. If it feels too dry, add a tablespoon more water. If it feels like soup, add a sprinkle more flour. You are not aiming for perfection here.
Step 4: Turn the dough onto a floured counter. Gently shape it into a round or an oval. Do not overthink the shape. Rustic is the goal. Wet your hands if the dough sticks too much.
Step 5: Place it on your baking sheet. Take a sharp knife and cut a shallow cross or a few slashes across the top. This helps the bread expand evenly and gives it that artisan bakery look.
Step 6: Bake for 35 to 40 minutes. You will know it is done when the crust is deep golden and the bottom sounds hollow when you tap it. That hollow sound is your reward.
Step 7: Wait. I know you want to slice immediately. Do not. Let it rest for fifteen minutes. This finishes the cooking inside and prevents gummy texture. Use this time to butter a plate and pour yourself something to drink.
Make It Yours: Variations That Actually Work
Once you nail the base recipe, you will start experimenting. Everyone does. Here are directions that have worked for hundreds of home bakers:
-
The Everything Approach. Press poppy seeds, dried onion flakes, and coarse sea salt into the top before baking. It tastes like an everything bagel had a baby with artisan bread.
-
Sweet and Seedy. Fold dried cranberries and a tablespoon of honey into the dough. Perfect for morning toast.
-
Herb Garden Loaf. Add dried rosemary, thyme, or oregano. Your kitchen will smell like a Mediterranean restaurant.
-
Cheesy Crust. Mix shredded sharp cheddar into the dough or sprinkle it heavily on top during the last ten minutes of baking.
Troubleshooting the Mistakes You Will Probably Make
Because you will make at least one of these. Everyone does.
Dense, heavy bread? You probably overmixed. This dough wants to be rough and shaggy, not smooth and elastic. Next time, stir less.
Flat as a pancake? Check your self-rising flour. If it has been sitting in your pantry since 2019, the baking powder has lost its power. Buy fresh flour.
Burned seeds on top? Cover the loaf loosely with foil after the first twenty minutes if your oven runs hot.
Gummy inside? You sliced too early. I warned you about this. Fifteen minutes of patience makes the difference.
Serving Ideas Worth Stealing
This bread does not need much. A pat of butter and a sprinkle of flaky salt is perfection. But if you want to build something more:
-
Toast thick slices and top with smashed avocado and a poached egg
-
Use as the base for a grilled cheese that will ruin all other grilled cheeses for you
-
Tear chunks into a bowl of tomato soup on a cold night
-
Drizzle with olive oil and balsamic vinegar for an effortless appetizer
Frequently Asked Questions
Can I use regular flour instead of self-rising?
Yes, but you need to add 1 tablespoon of baking powder and ½ teaspoon of salt per 2 cups of flour. Otherwise you will bake a brick.
What seeds work best?
Whatever is in your cabinet. Sesame gives nuttiness. Sunflower gives crunch. Pumpkin seeds look beautiful. Flax adds nutrition. Mix and match.
Is this bread actually healthy?
Compared to preservative-loaded store bread? Absolutely. You control every ingredient. Seeds bring fiber, healthy fats, and protein. The flour provides energy. No hidden chemicals. No long words you cannot pronounce.
How long does it stay fresh?
Two to three days at room temperature, wrapped in a clean towel. Do not refrigerate bread—it dries out faster. Slice and freeze for up to three months if you want to stock up.
Can I double the recipe?
Yes. Two loaves bake perfectly side by side. Just rotate the pan halfway through for even browning.
Your Next Move
You have the ingredients. You have the steps. You have no more excuses.
Tonight, while you are deciding what to make for dinner, reach for that flour. Pour that water. Toss in those seeds. In less than an hour, you will pull something warm and golden from your oven that you made with your own hands.
The first slice—butter melting into the crust, seeds crunching between your teeth—is going to hit different than anything from a plastic bag at the store. You will understand why this 3 ingredient simple seeded bread has become the secret weapon of busy home bakers who refuse to settle for mediocre.
Bake it once. Then bake it again next week. Pretty soon, you will stop buying bread altogether.
Drop a comment below and tell me which seeds you used and how your first loaf turned out. Did you stick to the basics or go wild with add-ins? I read every single one.
Ready to bake? Preheat your oven. Your kitchen is about to smell incredible.