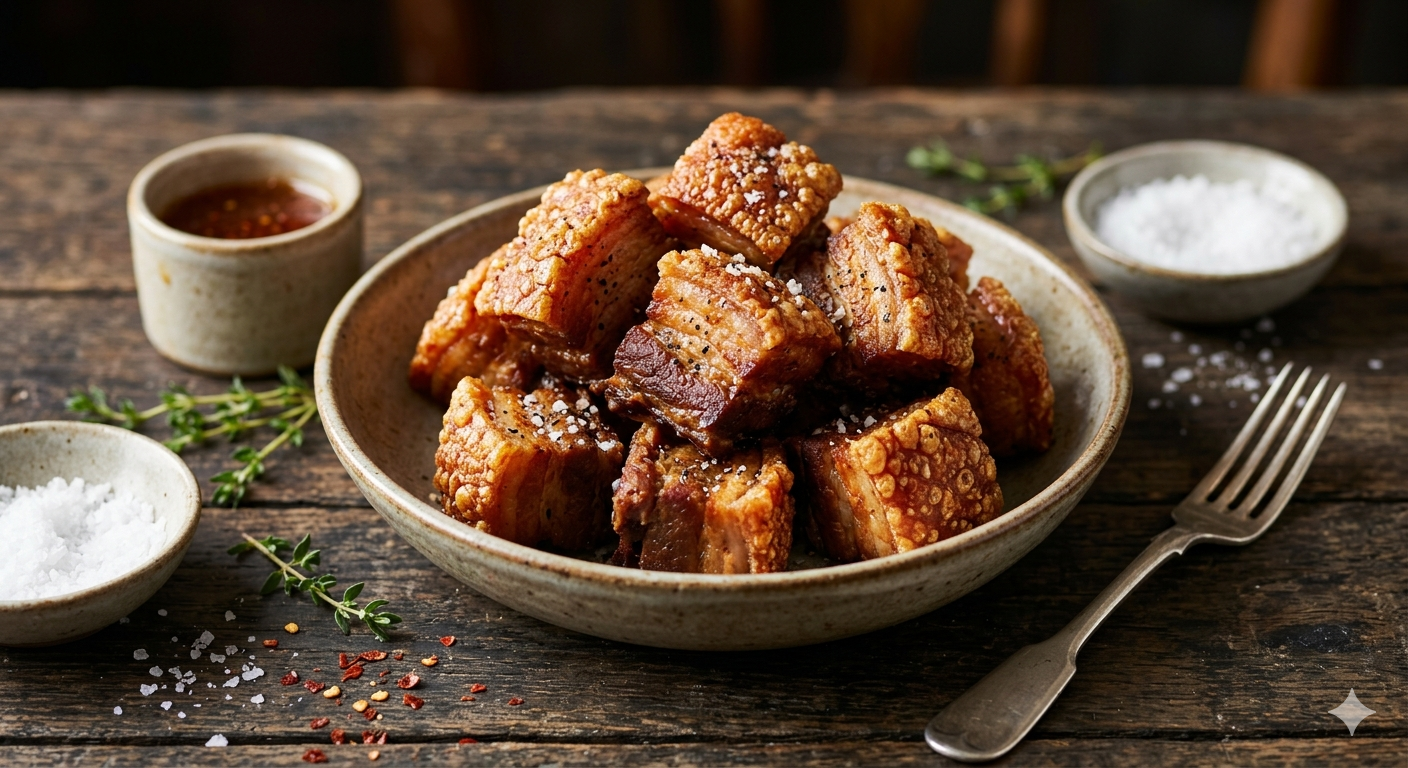
crispy pork belly bites
Crispy Pork Belly Bites: Your Complete Guide to Making the Crunchiest, Most Addictive Appetizer at Home
There’s a sound every home cook chases — that unmistakable crack when your teeth break through a golden, blistered crust and sink into meat so tender it practically dissolves on your tongue. If you’ve ever tasted crispy pork belly bites at a restaurant and thought, “I could never make that,” this guide is about to change your mind completely.
You’re not just reading another recipe. You’re getting the exact method that transforms a humble slab of pork belly into bite-sized cubes of pure crunch and richness. By the time you finish this article, you’ll have everything you need to serve crispy pork belly bites that make people stop mid-sentence and ask how you pulled it off.
What Exactly Are Crispy Pork Belly Bites?
Crispy pork belly bites are cubes of skin-on pork belly — that magical cut where layers of meat and fat sit beneath a thick cap of skin — roasted until the exterior shatters like glass while the interior stays juicy and rich. Unlike standard pork belly slices, the cube shape gives you multiple crispy edges per piece. Every single bite delivers that contrast between shattering crunch and melting tenderness.
The secret isn’t fancy equipment or hard-to-find ingredients. It’s understanding how heat, salt, and time work together to transform pork skin from rubbery to revolutionary.
Why Your Pork Belly Choice Matters
Before you even preheat your oven, you need to pick the right piece of meat. Walk up to your butcher counter and ask for skin-on pork belly with even fat distribution. The skin is non-negotiable — without it, you’re just making roasted pork, not crispy pork belly bites.
Here’s what you should look for:
-
Fresh, never frozen — frozen skin often refuses to crackle properly
-
Even fat layers — avoid pieces where the fat cap exceeds one inch
-
Clean, unblemished skin — any cuts or holes let moisture escape unevenly
-
Weight around 2 to 3 pounds — enough to feed 6 to 8 people as an appetizer
If your butcher looks at you funny when you mention the skin, find a different butcher. The skin is everything.
The Ingredients You’ll Actually Need
You don’t need a mile-long shopping list. Crispy pork belly bites rely on technique more than complexity. Here’s your complete lineup:
Table
| Ingredient | Amount | Why It Matters |
|---|---|---|
| Pork belly, skin-on | 2.5 lbs | The foundation — meat, fat, and skin in one cut |
| Kosher salt | 2 tablespoons | Draws moisture from skin; seasons deeply |
| Baking powder | 1 teaspoon | Alkalizes skin surface for superior browning |
| White vinegar | 2 tablespoons | Final drying agent before the high-heat blast |
| Five-spice powder | 1 tablespoon | Warm, aromatic backbone flavor |
| Garlic powder | 1 teaspoon | Umami depth without burning risk |
| Onion powder | 1 teaspoon | Sweet, savory complexity |
| Black pepper | 1 teaspoon | Subtle heat and balance |
| Brown sugar | 1 tablespoon | Balances saltiness; aids caramelization |
That’s it. Nine ingredients. No secret sauces. No gimmicks.
The Equipment You Can’t Skip
You don’t need a professional kitchen, but you do need a few specific tools:
-
A sharp chef’s knife or cleaver — for clean, even cubes
-
A wire roasting rack — air must circulate underneath the pork
-
A rimmed baking sheet — you’ll collect a surprising amount of rendered fat
-
A meat thermometer — precision beats guessing every single time
-
Plenty of paper towels — drying the skin thoroughly is non-negotiable
If you own an instant-read thermometer, grab it. If you don’t, buy one before you start. Temperature control separates okay crispy pork belly bites from legendary ones.
The Method: How to Make Crispy Pork Belly Bites Step by Step
Step 1 — Score the Skin Deeply
Lay your pork belly skin-side up on a cutting board. Take your sharpest knife and cut diagonal lines across the skin about half an inch apart, then rotate and cut diagonal lines the other direction to create a diamond pattern. Do not slice through the fat into the meat. You’re only piercing the skin itself.
Scoring serves two purposes: it lets fat render out during cooking, and it creates more surface area for seasonings to penetrate.
Step 2 — The 24-to-48-Hour Salt Cure (Do Not Rush This)
Pat the skin completely dry with paper towels. Mix your kosher salt with the baking powder and rub it aggressively into the skin, working it into every score mark. Place the pork belly on a wire rack, uncovered, in your refrigerator.
Leave it there for at least 24 hours. 48 is even better.
After a day, you’ll notice the skin looks dry, almost papery. That’s exactly what you want. The salt pulls moisture from the skin, and the refrigerator’s dry air finishes the job. This step is what separates home cooks who try crispy pork belly bites once and give up from those who nail it every single time.
Step 3 — Season the Meat Side
Flip the pork belly so the meat faces up. Combine your five-spice powder, garlic powder, onion powder, black pepper, and brown sugar. Rub this mixture evenly over the meat and fat layers — not the skin. Let it sit at room temperature for 30 minutes before cooking.
Step 4 — Low and Slow Roast
Preheat your oven to 300°F (150°C). Place the pork belly on your wire rack, skin-side up, over a rimmed baking sheet. Roast for 2 to 2.5 hours until the meat is fork-tender and the internal temperature hits around 180°F (82°C).
During this phase, the fat slowly renders, basting the meat from the inside out. The collagen breaks down, transforming tough connective tissue into silky tenderness. You’ll collect a pool of liquid gold beneath the rack — save it for roasting vegetables later.
Step 5 — The Final Blast (Where Magic Happens)
Remove the pork from the oven and crank the heat to 475°F (245°C) — as high as your oven goes. Brush the skin lightly with white vinegar. Return the pork to the screaming hot oven for 20 to 30 minutes.
Watch it closely. The skin will bubble, blister, and transform before your eyes. You’ll hear it before you see it — that unmistakable snap and crackle that tells you something incredible is happening.
Pull it out when the skin is deeply golden and sounds hollow when you tap it.
Step 6 — Rest, Then Cube
Let the pork belly rest for 10 minutes. This allows the juices inside the meat to redistribute instead of running all over your cutting board. Then, using your heavy cleaver or sharp chef’s knife, cut the belly into 1-inch cubes.
Each cut should produce an audible crunch. If it doesn’t, your skin needs a few more minutes of high heat. Don’t settle for less.
What to Do When Things Go Wrong
Even experienced cooks hit snags. Here’s how to fix the most common problems:
Table
| Problem | Why It Happened | How to Fix It |
|---|---|---|
| Chewy, rubbery skin | Skin wasn’t dry enough before roasting | Always salt-cure 24+ hours; never skip the uncovered refrigeration |
| Skin burned, meat raw inside | Oven too hot too fast | Follow the two-stage method religiously |
| Dry, tough meat | Overcooked or wrong cut | Use pork belly with adequate fat; don’t exceed 3 hours at low temp |
| Uneven crispiness | Inconsistent scoring or fat layers | Score deeply and evenly; choose uniform belly pieces |
| Fat didn’t render properly | Temperature too low or time too short | Maintain 300°F minimum for 2 full hours |
Dipping Sauces That Elevate Your Crispy Pork Belly Bites
The richness of crispy pork belly bites demands bold, acidic accompaniments. Here are four sauces that never fail:
Chinese Mustard Dipping Sauce — Mix 3 tablespoons hot Chinese mustard, 1 tablespoon soy sauce, 1 teaspoon rice vinegar, and ½ teaspoon sesame oil. The heat cuts through the fat beautifully.
Honey-Sriracha Glaze — Simmer ¼ cup honey, 2 tablespoons sriracha, and 1 tablespoon lime juice until thickened. Sweet, spicy, sticky perfection.
Apple Cider Reduction — Reduce 1 cup apple cider with 2 tablespoons brown sugar and 1 cinnamon stick by half. Drizzle over the bites for autumn-inspired comfort.
Garlic-Lime Crema — Whisk ½ cup sour cream with 2 minced garlic cloves, the zest and juice of one lime, and a pinch of salt. Cool, creamy, and bright.
Frequently Asked Questions
Why do my crispy pork belly bites always come out with rubbery skin?
Moisture is your enemy. The salt cure isn’t optional — it’s the foundation. If you roast pork belly with damp skin, you’ll get chewy, leathery results every time. Dry skin crackles. Wet skin doesn’t.
Can I make crispy pork belly bites in an air fryer?
Absolutely. After the initial low roast, transfer your cubes to an air fryer at 400°F for 12 to 15 minutes. The circulating air creates excellent crackling, though the oven method typically delivers more even coverage.
How do I store and reheat leftovers without losing the crunch?
Store in an airtight container for up to 4 days. Reheat on a wire rack at 400°F for 10 to 12 minutes. Never use the microwave — it steams the skin and destroys everything you worked for.
Are crispy pork belly bites keto-friendly?
Yes — naturally. Just omit the brown sugar or swap it for a keto-approved sweetener. The base recipe contains virtually no carbohydrates.
Your Next Step: Start Tonight
You now hold the exact method for making crispy pork belly bites that rival anything served in high-end restaurants. The technique isn’t complicated, but it does demand patience and precision. Score that skin. Salt it well. Let time and heat do the heavy lifting.
Head to your butcher this week. Pick up a beautiful piece of skin-on pork belly. Start the salt cure tonight. In 48 hours, you’ll pull a tray of golden, crackling cubes from your oven and understand why this dish has captivated cooks across cultures for generations.
Don’t just read about it. Make it. Your kitchen — and everyone lucky enough to taste the results — will thank you.